WorkWith Waverly Pattern: Cute Pouch Cover for Phone

Hello Hello,

You know, it was not until more recently that I discovered the Waverly quarter patterns that are only for 97 cents at Wal-Mart. Truly, I think with a lot of ideas can come about from just one of these. Today, I wanted to make a little pouch and it ended up holding my earrings but I am sure that it’d make a cute phone “cover”, not case for protective reasons but just a cover even if you wanted to. This is what I used:

1 Waverly Pattern

1 Pair of Stud earrings 

Hot glue Gun

Scissors

How it’s made:

Step 1) Cut out 1 rectangular from the pattern, make sure the pattern is folded in half so it is double-sided.

2018-022

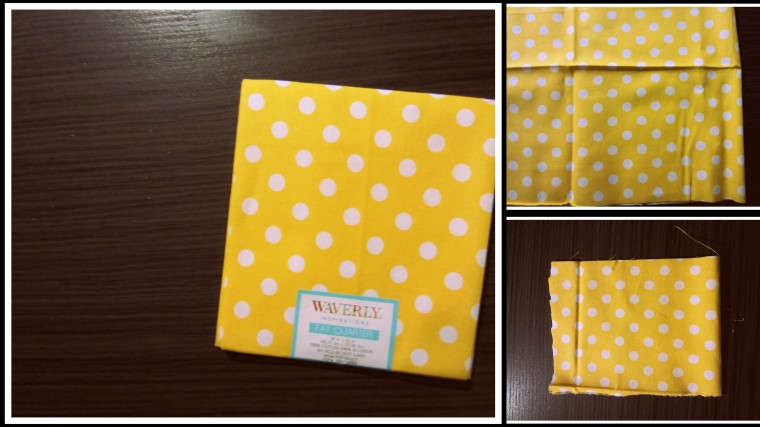
Step 2) Fold the left and right side twice down so that the shredded sides will not show the shreds and glue down.

Step 3) Glue the top of your pouch ( each side) inward. 

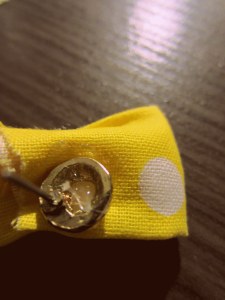
Step 4) Fold the top down and poke your earring into the center of the top of the pouch and you are done:

That’s all; you can really put whatever you want in this little pouch but just for some inspiration, I just made it a earring pouch.


WorkWith Throwaway Earrings: Little Bow Studs

Hi Everybody: Happy President’s Day!

I am finally back with a new craft idea. I love bows as I think that they quite darling so I figured it would be cute to turn an unwanted pair of studs into something I would wear such as bow stud earrings. Here’s what you’ll need:

Fabric of choice

Earring Studs that you’re not using

Super Glue OR Hot Glue Gun

Scissors

Beads/Gems/Pearls ( Whichever you have)

Here’s how the idea came to friction:

Step 1) Take your fabric and out a rectangle. Your earrings are on the smaller side so no more than 3 inches in length is just fine.

Step 2) Fold your fabric horizontally in half and glue. It does not need to be perfect, cut off what you can in terms of loose thread.

IMG_5700

Step 3) Fold your ends to meet in the middle and glue down to the center. At this step, you can cut your strips smaller depending on whatever size you want your bows to be.

IMG_5701

Step 5) Push the top and bottom of your piece towards the end and then fold the ends down, creating your bow. Glue the center down so that the bow may keep it’s shape.

IMG_5708

Step 6) Glue on your earring stud onto the back center of your bow.

IMG_5707

Step 7) Glue on an embellishment to the center and you are done:

IMG_5710

Tada 🙂 

Sure, these may not be as practical to wear on an everyday basis but if its the summer time and you have a cute summer dress, these just may do the trick!

As always, WorkWithIt, Girl! For now, there will be new post every Monday!

WorkWith Flower Hole Puncher: Chic Flower Choker

Hiiii!

Backstory: So, today’s craft was actually one that I came up with in an effort to be published in this popular craft magazine for their Spring edition. I know it’s not Spring here nor is it close in the U.S but I wasn’t going to let that stop me from sharing this cute little craft. Here’s what I used to make them:

1 piece of scrapbook paper

Hempt ( ribbon/basic string would work too)

Flower hole puncher

Handy Dandy: Glue Gun

How It’s Done

Step 1) First take your string, measure a piece that can comfortably fit around your neck ( and to be tied) and cut three separate pieces of string so that you can braid it.

Step 2) Punch out many mini flowers with your hole puncher and then glue them via their center onto your braided hempt.

Step 3) Tie the ends and you are done * It is optional as to how you want to finish your choker. You can actually use a clasp of some sort or you could do a simplistic tie in the back; the choice is yours.

Okay, so to be honest, these were initially meant to be bracelets but when they were just way too big to be so, I just decided to transition them into neck chokers. You can make these unique fashion accessories be whatever you want it to be.

~ WorkWithIt, Girl: Make It Yours, Make It Work

WorkWith Mason Jar: Jar Of Hearts 4 Valentines Day

Good February to you guys,

I am kicking off this month with a craft that I created years ago for a women’s community group “party” that was around Valentines Day’s: Jar Of Hearts. I shared this craft on an older blog that I had quite some time ago but I am glad to be brining it back to this one. If you want to give a craft that is thoughtful, sweet and affordable at the same time, just keep on reading:

What you’ll need: 

Mason Jars

Scrapbook Paper/Copy Paper/Construction Paper ( Whatever you have)

Ribbons or other decorative material for your jar

Scissors

How it’s done: 

Step 1) Take your paper and cut several hearts out of it. It can be small hearts, big ones, many or not of hearts; you can do what you please.

IMG_5380

Step 2) Write down messages on each heart. This can be things that you love about someone, that you love that they did for you or kind thoughts in general such as bible verses of encouragement and love.

IMG_5381

Step 3) Fold your hearts in half and place into your jar. Tie your ribbon around your jar and you are done:


It’s sweet, it’s simple and something which we all could create with the materials that we already have. From me to you, Happy Valentines Day! You are loved by Christ, first and foremost.

WorkWithIt, Girl: If you don’t have it, then you have to question whether or not you were meant to have it. And if you truly believe that you are, then you are going to do what you can to ” make” it. 

WorkWith Cookie Cutters: I Heart Ice Cream Treats

Hello Hello!

The craft that I am going to share with you was inspired by my own line of work being a doughnut designer. Let me explain; we used to make these Yum-Nut ( Doughnut Ice Cream sandwiches) by putting ice cream in these metal rings that would form thick circles after we stuffed it with ice cream. So, as I looked as these cookie cutters, I was curious as to whether I could do the same thing with what I have to create ice cream treats…and here’s how it came out.

What I Used: 

Cookie Cutters ( 2 Heart shaped)

Vanilla Bean Ice cream ( You can use whatever you have)

Sprinkles ( You can use chocolate, gauche, etc)

All I Did:

I took some cookie cutters and lined them , imperfectly, with saran wrap. The saran wrap did not need to be perfect because it was mainly there to help get the shapes out.

I scooped a generous amount of ice cream into each cookie cutter and pressed down with the back of my spoon. It was important to press down to make sure that the ice cream went all the way down through the cookie cutter.

I wrapped the tops casually with saran wrap and popped them into the freezer until as solid as I could wait for ( this is the done) : D

IMG_5403

I sprinkled each heart pink/red sprinkles and wala. Okay okay okay, so the heart shaped could be more defined but we can’t take back time can we ? I will make sure I press down more; especially around  the center crease but it did not turn out bad!

IMG_5410

It is nothing complicated but has everything it needs; who wouldn’t want a thick bite of ice cream. I figured this would make a cute treat at a little party ( providing they are in the freezer until served) or just a nice snack for Valentines Day after dinner itself. Is it just me….what do you think ?

WorkWithIt, Girl: Make It Yours, Make It Work. 

WorkWith Canvas Board: Heart Light

Hey Everybody!

I have been in the process of moving recently and with all the struggles, I just had not had the mindset to create so I am glad that I did this post ahead of time for sure. That being said, I hope to have to awesome and increasingly engaging content coming out soon. Now for this post, I don’t believe this craft was meant to be this and now that I think about, it wasn’t suppose to; it was actually suppose to be a Heart Coin Purse. After a bad cutting job * ha*, it ended up being this heart light. You really could make this with regular paper ( just cut the paper in half) but if you have an extra canvas board…okay maybe this is not a practical craft but hey, here’s how you can workwith a few pieces of canvas fabric.

What I Used:

1 LED Light ( I just love these)

1 Canvas Fabric ( Or Paper)

Scissors/Tape

What I did:

First I took the fabric off of my canvas and made cut it in half. It should have been equal in size but they certainly weren’t. Make sure you cut it evenly…unlike myself.

Fold the fabric in half ( each piece) and cut out a heart

IMG_5599

Wrap your heart around your LED and tape the back and you are done!

Uh, this was so easy ( and maybe impractical) that this wasn’t really a how to, just a can do sort of post. Anyhow, I hope that you all have a wonderful Valentines Day, know that are loved by Christ first and foremost.

~ WorkWithIt, Girl: Make It Yours, Make It Work.


WorkWith Scrapbook Paper: Cute Heart Banner

Hi Everyone!

With Valentines Day right around the corner, I wanted to create at least one decorative piece that you can do to dress up your locker, your room, your office desk or even a little Valentines get-together. So, using some scrapbook paper strips that I had just purposeless in my craft bag, I decided to workwith them to make this super simple heart banner. Here’s how its done:

What you’ll need:

Scrapbook Paper

Stapler

How to create the banner:

Step 1) Take your scrapbook paper and using a ruler, cut strips all down the paper. ( vertically or horizontally). How many strips you cut depends on how long you want your banner to be.

Step 2) Take one strip, fold it in half ( V shaped) and then fold in each side creating a heart. Staple the center and keep on going.

Step 3) You can now staple your hearts in a straight line or create a curve ( so that it’ll have a downward center vs. straight).

And you are done:

Maybe you have already seen this before but I haven’t so I figured I’d share it here. Hope you guys like it. Happy Early Valentines Day!

WorkWithit, Girl ~


WorkWith Canvas Board: Cute Letter Wall Frame

Good Monday to you!

Today I wanted to share with you how to make this simple flower puncher letter board to hang up in your children’s room. It was great to finally use the last canvas from my birthday back in 2016 ( seriously, I got a pack from Michael’s and I never used all 10 until now) to make this and it’s so simple to do! Here’s how you can make it:

You’ll need: 

1 Canvas Board

A Hole Puncher ( I got this mini Flower one from JoAnn’s Crafts for 2.00) but you can use any kind of hole puncher you can get your hand on)

Scrapbook Paper of Choice

Glue

Let’s get started:

Step 1) Take your hole puncher and punch as many flowers or whatever design you are using through your scrapbook paper. My paper was double sided so I was able to take advantage of the different designs.

Step 2) Glue your punch-outs onto the sides of your canvas and also the entire perimeter of your canvas.

Step 3) Glue the letter of your choice using the leftover punch outs. This is optional as you could also glue wooden letters, use paint to decorate the middle or whatever you’d like. You are done:

Thank you for joining me for today’s post. Have a wonderful rest of the week!


WorkWith Mini Reese Cups: Mini Cupcake Lollipoles

Good Friday to you! Can you believe it is Friday, already ? I kind of feel like I was just saying ” Happy Friday”, anyhow, Blessed Friday to you.

Today I wanted to share with you an old idea that shows that when one door closes, another one can certainly open. I had initially intended to share a DIY on how to make these Reese Cup Award Banquet cut-outs but lets just say that it turned out better in my head than in reality. So, I thought I would revisit the idea to make Reese lollipops. As I recalled the miniature Reese’s, I thought that it resembled the bottom of a cupcake and subsequently, today’s post was born.

Here’s what I used:

Hard Straw
Icing ( Use whatever you have)
Piping bag or sandwich bag
Jumbo Rainbow Sprinkles
Scissors

All one has to do:
Step 1) Take your hard straw and cut it in half


Step 2) Unwrap your miniature Reese and insert the straw end in by twisting it while applying pressure. Be mindful that you don’t want to crush your candy.

IMG_4940

Step 3) In a sandwich bag ( cut a hole in a corner) or piping bag, insert your icing, the nice the top of your “Reese” cupcake. Once done, it is optional, to place decorations on top.

That is all!

It was my intention for them to be like little chocolate lollipops but how practical they are in relation to that…I am not sure. You could probably even keep their brown outer wrapping on to cover up the edges if you’d like or even take away the straw and have a bunch of mini reese cupcakes. Let me know what you think in the comment section below and as always, join me every Monday, Wednesday & Friday for MORE posts!
~ WORKWITHIT, GIRL

WorkWith Twix/Snickers: Brownie Truffle Bites

Hello Hello,

Thank you for stopping by for today’s post and welcome to all the new visitors here on WorkWithIt, Girl. I am quite excited to bring up this spur of the moment idea that my friend inspired me with. She recommended putting melted candy bars into the brownies that I had. I figured subsequentedly that I could get away with turning the melted candy bars into a cake pop of the sort. Here’s how it’s done:

What you’ll need:

Baked Brownies ( I had already baked some Pillsbury Chocolate Fudge Brownies)

Your favorite chocolate bars ( I used Twix & Snickers because that’s what I had).

Melted Plain Chocolate ( Milk Chocolate, Dark Chocolate, etc)

Hard straws/cake pop holders are optional

How it’s done:

Step 1) Melt your candy bars and smash separately with a fork. If your bar has a wafer in it, crush it up before you melt it preferably. Be careful not to burn the candy bars.

Step 2) Grab a spoonful of your brownie ( be generous) and put a scoop of your melted candy mixture into the middle and roll into a ball.

Step 3) Melt your plain chocolate in a microwave safe bowl and roll your truffle ball in it. It is best to let your truffle balls sit in the freezer to firm up before you do this step so that they won’t fall apart when rolling them in the chocolate.


Step 4) Place in the freezer until chocolate has completely solidified and you are done:

Pop these in mini cupcake liners or insert a straw into them to make them your own brownie pops and there you go. Let me know in the comment section below what your favorite candy bar is!

Happy Valentines Day!


WorkWith Biscuits: Cinnamon Biscuit Rolls

Rise & Shine, People!

Today, I wanted to share with you one of my favorite kind of breakfast food: Cinnamon Rolls. With the advent of things like Cinnabon, we can say that this food is not really a “breakfast” item at all, but it surely does work for me anytime of the day. So, today, I wanted to show you an idea that I shared on an older blog of mine: Cinnamon Biscuit Rolls. It’s improvisation at its best….or not.

What you’ll need:

1 Can of Biscuits ( you can use the Junior size or the regular size). I used the Flaky by Pillsbury

Brown Sugar/Cinnamon/Sugar ( combined) just like your regular cinnamon roll mixture.

Butter

A Knife

How it’s done:

Step 1 ) Take your biscuit and flatten it out into a rectangular sized piece ( it does not need to be perfect), you don’t even necessarily have to make it a “rectangular piece”.

Step 2) Coat some melted butter onto the top, then add your Cinnamon Roll Sugar Mixture

Step 3) Roll up your biscuit into a roll and seal the end to the best of your ability. Then cut your biscuit into multiple small cinnamon rolls if you will.

Step 4) Pop into the oven until biscuit rolls are fully cooked ( and don’t forget the non-stick spray. You are done! Coat with whatever you’d like, icing, butter, powdered sugar, etc:

Note to self: Stop using aluminum foil in pictures. But really, people talk about how easy it is to whip up biscuits but not cinnamon rolls all the time. So, taking biscuits, you can make a less sweeter version of the cinnamon roll which works until you get your hands on the real thing. If it doesn’t work, then at least a girl tried.

WorkWithIt, Girl!


WorkWith Pizza Cardboard Tray: Sticky Note Board

Happy Friday!

When I tell you that I am ready for this weekend….even though I only had a four day work week because of Martin Luther King Jr Day, I still mean it! Today’s post almost did not happen but I figured that it would be productive and improving of my consistency to keep with it, even if I did not all the way feel like it. For this post, I worked with a cardboard pizza tray ( the piece of cardboard that the pizza is usually on) to make a sticky board to hang on your door, locker or fridge even to jot down those reminders that you have during the day.

All I used was 1 Leftover Cardboard box tray, scrapbook paper and sticky notes.

First,

I took my piece of cardboard and stapled my scrapbook paper around the edges onto it. I chose to use scrapbook paper but by all means, you can use what you have to decorate your board.

Next, I punched two holes onto the top of my board and tied a ribbon for a handle purposes on each side.

Then, I took my sticky notes and taped them to the board. You can also glue them down but glue just might make it a one-time sticky board. Just hang & you are done:

Man, I have really just been into boards this year, haven’t I ? Anyway, as always, even if you do not find this craft practical for your life right now, the point is not the craft itself but just to encourage you to work with whatever you have to make what you do not have.

Be encouraged, WorkWithIt, Girl ~ See you MONDAY!